How to rename photos in bulk
As we collect and copy photos from different sources, such as a cellphone, family and friends, or from the web, the image file names can sometimes become very long and complicated. This can cause issues when attempting to display such photos on a photo frame.
It is recommended that the file names be renamed to something more compact and meaningful, such as “wedding-day-1234.jpg” or “2016-11-29_1234.jpg”, which is much easier to organize. Renaming photo files like this will also resolve many photo frame display issues caused by long and complicated file names.
This tutorial will walk you through the steps of renaming photos in bulk using the freely available software tool FastStone Image Resizer. At this time, this software tool is only available for Windows. Luckily, there is an existing bulk file rename feature built in to the Mac OS X Finder, and a great tutorial on how to use it is here: Link to Mac Tutorial.
For those of you using Windows, please follow the steps below to rename images in bulk.
- Copy the image files you have onto a SD card or USB drive. Make sure that the card or USB drive has only those image files you want to rename. Keep your original image files in a safe backup location.
- Download and install FastSTone Image Resizer program from the FastStone website: http://www.faststone.org/FSResizerDownload.htm
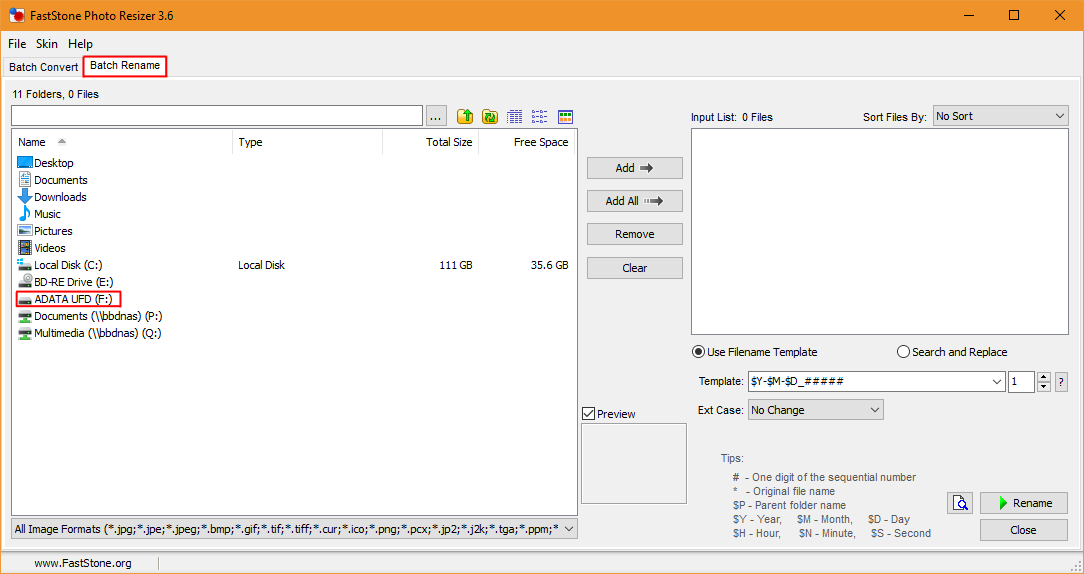
- Run the FastStone Image Resizer program. A window will open like the one below. Click on the “Batch Rename” tab at the top of the window, then find your SD card or USB drive in the list and double click on it. For the purpose of our tutorial, the USB drive we are using is named “ADATA UFD” and has drive letter F.
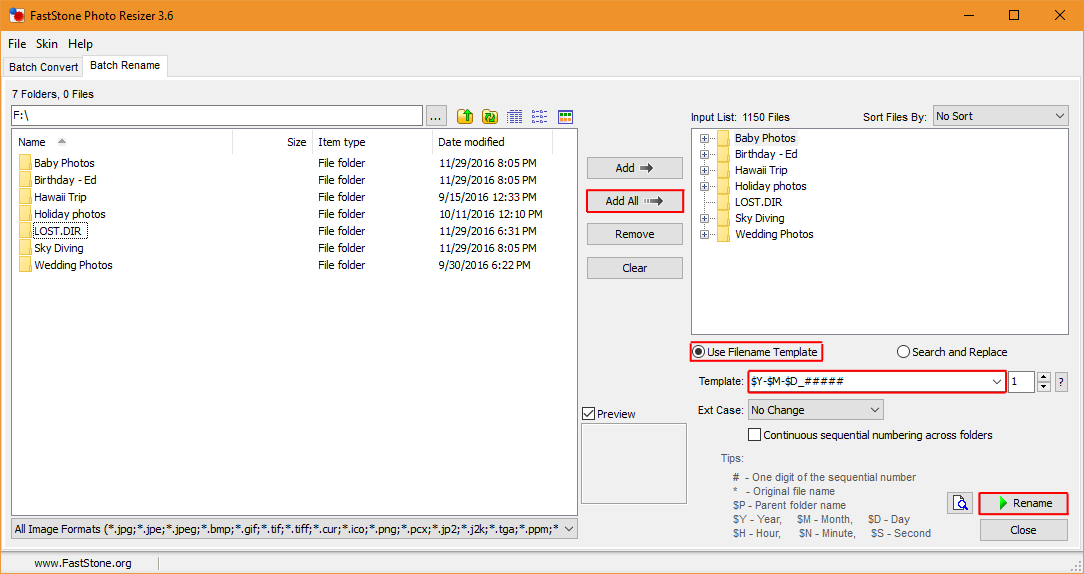
- Next, click on the “Add All” button, this adds all of the folders and images found on the drive to the list of files to be renamed.
- Make sure that “Use Filename Template” is selected. Click on the “Template” drop down box, and select “$Y-$M-$D_#####”. This renames the files based on the photo date, which is the most popular option. There are other renaming templates, which you can feel free to explore and see which one works best for you.
- Once the above options are set click “Rename” button.
- The program will then proceed to rename all of the image files on the SD card or USB drive based on the settings.


And that’s all there is to it! If you run into any issues following this tutorial, please don’t hesitate to contact us for support by clicking on the “Support” tab of the product page, or by simply emailing support@miccatron.com.
Posted in: Micca M1003Z, M1203Z, M1503Z, Micca M1709Z, Micca M707Z, M808Z, M1010Z, Micca Neo Series Photo Frames
